Thursday, February 26, 2009

Lady Marmalade: Blood Orange Marmalade

marmalade

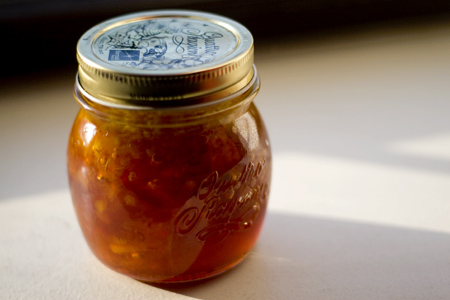
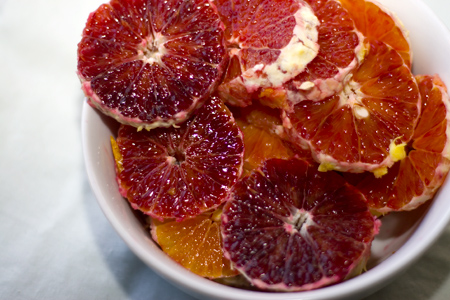
So, you know how I've been going on and on about winter citrus and its restorative effects on the dying winter soul? Well, let me tell you. I have not been returning the favor--I've had a whole pile of Meyer lemons and blood oranges languishing in my refrigerator for weeks, barely hanging on to this mortal coil. It got to the point where my guilt was so significant that I embarked upon the unthinkable: I decided to make marmalade.

This was An Event for two major reasons:
  1. I've never made jam of any sort
  2. Despite being half English, I've never really had much of a taste for the stuff.
However! When one is talking wasted citrus, one must rise to the unexpected challenge! Or attempt to, anyway. I'll admit it: it took me a few tries to get this one right. I didn't have a real recipe to work with, and I'd never worked with pectin; I also failed to properly measure the amount of fruit I was using, so I ended up with marmalade soup at the end of the first cooking. Cooking it twice, while probably not ideal, didn't seem to hurt the concoction too much. If anything, I think it may have intensified the citrus flavor.

Things I learned:
  • Using only the zest of the orange (discarding the pith and most of the rind) cut the bitterness factor significantly while still allowing the extreme...well...citrusness of the fruit to really shine.
  • Marmalade is far more delicious than I'd given it credit for (though, admittedly, my marmalade may not be...well...traditional.)
  • Many marmalade recipes call for a metric shedload of sugar. I believe that if you boil longer, you can get a similar effect without as much. I mean, 7 cups? Really?
  • Canning and jarring and jamming is nowhere near as daunting as I'd once thought. All you need are a big pot, a pair of tongs, a spatula (for getting the filled jars in and out) and a good book to read while you stir the pot.

oranges

Blood orange marmalade

8 Whole blood oranges.
3 Meyer lemons, sliced thinly
4c sugar
Pectin (I used one pouch of Certo brand liquid pectin, by Sure-jell)
  1. Remove the outer layer of zest from the orange (if you want the marmalade texture, do this with a vegetable peeler; if you're lazy like me, you can use your microplane), taking care not to get too much of the bitter white layer beneath. Set the zest aside.
  2. Peel the oranges and then slice them thinly and chop them roughly. remove any tough pith or seeds that you encounter, but save as much of the juice as you can!
  3. Put the oranges and lemons in a deep saucepan; add the pectin and let sit for a moment.
  4. Add the zest.
  5. Add the sugar and then bring the contents of the pan up to a boil. Boil, boil, boil away (stirring as much as you can reasonably bear) merrily until it's thick, syrupy, and passes the spoon test.
To preserve your marmalade:
  1. Get a bunch of canning jars.
  2. Wash them in hot, soapy water
  3. Boil them mercilessly for about 15 minutes, then remove them from the pot.
  4. Ladle your marmalade into your clean, sterilized jars. Gently seal the tops and boil them at a rollicking, high temperature (with at least 1 inch of water covering them) for 5 more minutes. Turn off the heat, but leave the jars in there until the water is lukewarm (I tend to leave the jars in the waterbath overnight). This should activate the vacuum seal on the jar, characterized by the sort of dip in the middle. If you don't have a vacuum seal by the time the water cools, remove the jar and try again with a new lid.

Wednesday, February 25, 2009

Pancakes for Dinner: Vegetarian Pa Jeon

Hey readers! We've moved! Come check us out at the newer, awesomer Pithy and Cleaver! You can read about Pa Jeon on the new site right here.


February 24th was International Pancake Day. And I made these tasty Korean pancakes for dinner. But it was totally a coincidence.

When I started looking at recipes for Pa Jeon, I was not even aware of the existence of Pancake Day, which apparently arose from an old tradition of using up eggs and fat before Lent begins. But here I am with a belly full of pancakes. And you should make these for dinner, pancake day or no.

It's a great tight-budget recipe, using a few pantry ingredients and giving you an opportunity to clean out the fridge. Depending on what you have around, these basically are free. Or, like, five dollars, max. Got some extra zucchini? Slice into matchsticks and throw it in. A few shrimp languishing in your freezer? Thaw, chop and add. I did a vegetarian version, but you could stir leftover cooked meat into the batter if you've got some around. Bits of sweet red peppers would be great, too. The only real essentials are a batter (preferably made with half rice flour, which gives it a sweetness and lightness, as well as crispy edges) and a vinegary dipping sauce.


I found the rice flour at a local asian market (M2M, in case you're in New York.) The package just says "Rice Powder" and it looks a little suspicious, but it tasted great and I've lived to tell the tale. It wouldn't shock me if Whole Foods had some, as well, maybe in the gluten-free section? In fact, I bet you could make these entirely gluten-free with minimal adjustment to the recipe, just subbing out the cup of wheat flour for something safely GF. Many soy sauces aren't gluten-free, though, so watch out for that.

While I was making these for the first time, I was struck by the similarity to latkes, an old favorite. Even down to the trick of adding a bit of seltzer to fluff up the batter! (Trick courtesy Cathy of Not Eating Out in New York.) These are a bit more soft and pillowy, though. Perhaps we should try dipping latkes in ginger-vinegar sauce. Now that's fusion.


Vegetarian Korean Pancakes (Pa Jeon)
adapted from Mark Bittman
Serves 2

For pa jeon:
1 cup all purpose flour
1 cup rice flour
2 eggs, lightly beaten
1 1/2 cups cold unflavored seltzer water
1 tablespoon canola oil, plus extra for the pan
1 cup garlic chives (scallions are ok), sliced in 2-inch lengths
1/2 cup carrots, peeled cut into thin matchsticks (if you grate them, they disappear into the batter)
1/2 cup shitake mushrooms, sliced
1 tablespoon prepared kimchi, chopped, plus additional for serving

For vinegar dipping sauce:
1/4 cup soy sauce
3 tablespoons rice vinegar (unseasoned)
1/4 teaspoon sesame oil
1 teaspoon sugar
2 teaspoons minced or grated fresh ginger
1 teaspoon toasted sesame seeds

To prepare dipping sauce, stir first first four ingredients in a bowl until sugar dissolves. Add ginger and stir, crushing slighly against the sides of the bowl. Let macerate, stir in sesame seeds when you're ready to serve.

In a large bowl, gently mix flours, eggs, seltzer, and oil until smooth. Let rest a few minutes while you prepare the vegetables. Stir in vegetables, including kimchi, tossing to coat. Heat a large seasoned cast iron pan over medium heat and coat with a bit of oil. When pan is hot, drop batter with a ladle to form 4 or five pancakes (smaller pancakes are easier to flip than large.) Spread out batter so it's no more than a half-inch thick. Turn heat down to medium-low. Cook about 4 minutes, flipping when pancake no longer resists, then cook about 4 minutes on the other side. Pancake should be crispy and brown, with no liquid inside. Remove to a plate. Repeat with remaining batter.

Serve hot with vinegar dipping sauce, extra kimchi, and hot sauce, if desired.

Tuesday, February 24, 2009

A shot of spice: Tequila-lime Shrimp with Spicy Corn and Roasted Red Pepper Risotto

Hey readers, we've moved! Check out the newer, awesomer Pithy and Cleaver right here!

I got a phone call the other day from my old college roommate, Hannah. She's been living in Grozny and Sierra Leone since 2004, but she's working in New York for a few months. She was checking out apartments from Brooklyn to the Upper East side, looking for a room to sublet during her time in the city.

"I'm in your neighborhood, I think," she said, and we made plans to meet up after she saw the room. She called back two minutes later. "Um, when I said in your neighborhood, I meant in your building," she said. "Your name is on the mailbox downstairs." Sure enough, the room that she'd found randomly on craigslist was just two floors down from me! So for two months, we will pretend to be roommates again, and catch up after being many, many miles apart since graduation.


This meal, which we made with another college friend/former roommate (the lovely Jackie), was perfect for collaborative cooking. (I can take no credit for the recipe selection—Jackie chose these, and they were winners.)

The three of us took turns stirring while we drank some wine—none of the labor was too taxing. At the last minute, when the risotto has softened adequately, the shrimp cook up quick in a pan (or a grill, if you have it.)

Studded with corn and peppers and spiked with spice, this dish is not your mama's risotto. It has a real kick to it, balanced by the sweetness of red peppers and shrimp. Keep a glass of water (or a beer) handy.


Spicy Corn and Roasted Red Pepper Risotto

Adapted from Cooking Light

Yield: 4 servings

1 3/4 cups water
3 1/2 cups low-salt vegetable or chicken broth or stock
2 teaspoons olive oil
1 cup uncooked Arborio or other short-grain rice
1 teaspoon ground cumin
1 teaspoon ground coriander
4 garlic cloves, minced
1 cup thinly sliced scallions
3/4 cup shredded Monterey Jack cheese
1 jalapeno, chopped, seeds removed
1/4 to 1/2 teaspoon hot sauce
2 cups frozen whole-kernel corn
3/4 cup chopped bottled roasted red bell peppers, removed from liquid

Combine water and broth in a medium pot and bring to a low simmer. Keep warm over low heat.

In a large saucepan, heat oil. Add rice, cumin, coriander, garlic, and jalapeno, sauté for one to two minutes until rice is slightly translucent. Stir in 1/2 cup of the broth mixture, cook until liquid is nearly absorbed, stirring constantly. Gradually add remaining broth, half a cup at a time, waiting and stirring until broth is absorbed before adding more. Cook about 20 minutes total—it's possible you may not need all of the liquid. Taste rice, it should be tender. Stir in scallions, cheese, hot sauce, corn (still forzen!) and roasted peppers. Cook and stir 3 minutes, until heated through. Top with Tequila-lime shrimp.

Tequila-Lime Shrimp
adapted from Health

2 tablespoons tequila
1 tablespoon fresh lime juice
2 teaspoons olive oil
1 teaspoon bottled hot sauce
2 garlic cloves, minced
24 large shrimp, peeled and deveined, with tails on (about 1 1/4 pounds)
lime wedges for serving

After your risotto (see recipe above) has been cooking awhile, combine tequila, lime juice, olive oil, hot sauce, and garlic in a large tupperware container. Add shrimp, toss to coat, let stand ten minutes while you cook the risotto. Heat a large cast iron pan, grease with a small amount of olive oil. Add shrimp (cook in several batches if necessary.) Cook a few minutes per side until just opaque. Serve on top of risotto with lime wedges.

L'Avventura!

Hello, ducks!

I'm jaunting off on a European adventure in, oh, twenty minutes, which means I'll be out of pocket for the next couple of weeks. I'll try to update from the road, but for the most part, I leave you in the lovely and capable hands of Maggie.

See you soon, lovelies!

cheers,
shiv

Monday, February 23, 2009

Almost like being in New York: Pretzel-crusted chicken

alone

I don't know if it's a New York thing or what, but I'm mildly obsessed with the street pretzel. There's no real explanation for it; street pretzels are uniformly dry, too salty/not salty enough, and unvaryingly stale within seconds. However, slathered in mustard, they're still one of my favorite afternoon treats. They're also, for the aforementioned reasons, sometimes a little too gross for me to deal with. It's on those days that I start to consider how I can bring a slightly less scary version of those flavors into my life; it took a very long and taxing week to finally inspire me to do something about it.

I had a dim recollection of a recipe for pretzel-crusted chicken in the November or December issue of Food and Wine; though I couldn't find the actual clipping in my files, a quick spin through the interwebs turned up this, which seemed as good a place as any to start. Naturally, I didn't follow the recipe to a tee; I omitted the oil, replacing it with a buttermilk and mustard marinade, and I swapped out the chicken breasts in favor of my new favorite poultry product, boneless chicken thighs. I also added in some thyme for zing, and (unsurprisingly) a tiny bit of raw garlic (emphasis on "tiny"). The alterations were minor, but the impact was massive--what I ended up with was a low fat powerhouse of flavor: oven baked, tangy, zingy, crunchy, moist and with far more nutritional merit than your average street pretzel.

together

Flavor-wise, I am very happy with how this turned out; the texture was also very pleasing...though I'll admit: next time, I'm probably going to go whole hog and pulverize the damn pretzels with a hammer. Food processors are great and all, but sometimes you need to work up an appetite, you know?

Pretzel-crusted honey mustard chicken
Adapted from Food and Wine, November 2008

1/2 lb hard pretzels, coarsely crushed
3/4c buttermilk
1/2 c wholegrain mustard
1/8 c honey
1 very, very small clove garlic (the sort that lurks near the heart of the bulb), finely chopped
2 tbsp fresh thyme, chopped
salt and pepper
6 boneless, skinless chicken thighs
1 egg, lightly beaten
  1. Prepare your marinade: combine buttermilk, mustard, honey, thyme, salt and pepper. Mis thorougly and then combine with chicken in a ziptop bag. Marinate in the fridge for up to a day.
  2. Smash the pretzels in your food processor (or with a hammer, if you've had a bad week). You should have fine crumbs and large chunks. Put in a shallow bowl and set aside.
  3. When you're ready to cook, preheat your oven to 400F. Remove the chicken from the fridge and from the marinade; set aside. Combine egg with marinade and mix thoroughly; use this mixture to dredge the chicken thighs before coating them in pretzel chunks. Be sure to coat thoroughly!
  4. Bake in the upper third of your oven for 20 to 25 minutes, or until the chicken's juices run clear.
  5. Optional: make a little sauce out of buttermilk, mustard and honey. DO NOT USE LEFTOVER MARINADE. Unless you like salmonella.

Thursday, February 19, 2009

Spicy and Quick: Chipotle Tortilla Soup

Hi friends! We've moved! Please come check out this entry and many more at the newer, awesomer Pithy and Cleaver!


What do we eat when we're not eating macaroni and cheese?

Leftover macaroni and cheese.

When that's (finally) gone, it's time for something lighter and brighter. Something spicy enough to clear out the sinuses. And something Matt can easily reheat for a quick bite before heading out to teach his nighttime class at NYU. (I'm sure the girls would all have crushes on him while he explains Matlab wearing his cute little corduroy jacket...if there were any girls in these sorts of classes.)

I am not going to claim that this recipe is one bit authentic. But it's slightly better than the recipe my mother picked up at Trader Joe's once: dump a container of salsa, a can of beans, a can of corn, and some broth in a pot, stir. And it really does the trick, quickly and cheaply—about five dollars a person, maybe less if you don't have to shop in Manhattan.

You could make a vegetarian version with veggie broth, though I used a container of turkey broth that's been in my cupboard awhile. I know! I'm all out of homemade stock. But given the smoked chiles and the kick of acidity from lime and tomatillo, this is flavorful enough with the boxed stuff. Not that I'd stop you if you have real stock to spare.

If you're not a huge fan of spicy, I'd dial down the chili powder and red pepper flakes but keep the chipotle, which gives the broth a lovely smokey flavor. And fast. Sometimes you just need the kind of dinner that goes from pantry to table in half an hour. We ate huge bowls full along with sweet corn bread (I know, how gauche) until we were stuffed.


Quick Chipotle Tortilla Soup

serves four

2 small onions, chopped
2 tablespoons olive oil
4 cloves garlic, smashed and sliced
1 tablespoon paprika
2 tsp ground cumin
1 teaspoon ground coriander
1 teaspoon chili powder
1 teaspoon dried oregano
dash red pepper flakes (optional)
1 qt low-salt stock or broth
3 chipotle chiles in adobo (about half a can), chopped
2 14-oz or 1 28-oz cans fire-roasted diced tomatoes, including liquid
1/4 cup water (I just add this to the empty tomato cans to clean out the remains)
1 can cannelini beans, rinsed and drained
10 oz frozen corn kernels (one package)
3 tomatillos, chopped
1/2 red pepper, chopped
juice of two small limes
1/4 cup cilantro, chopped

for serving:
1 avocado
handful cilantro, chopped
several handfuls tortilla chips
queso fresco (if unavailable, use mild feta or jack cheese)
lime wedges

In a large dutch oven or heavy soup pot, saute chopped onion in olive oil until translucent. Add garlic, paprika, cumin, coriander, chili powder, oregano, and pepper flakes if using. Stir and saute until fragrant, about one minute. Add stock, chipotles, tomatoes, water, and beans. Simmer ten minutes to let flavor mingle. Add corn, tomatillos, red pepper, and lime juice, simmer an additional 15 minutes. Stir in cilantro and taste. Go light on the salt, since the tortilla chips will add a bunch. Slice avocado and divide between bowls, saving a little for a garnish. Put a handful of crumbled tortilla chips in each bowl. Ladle soup on top, and top with additional cilantro, avocado, chips, and crumbled queso fresco. Serve with lime wedges.

Wednesday, February 18, 2009

Valentine's day massacre: Four cheese macaroni

mac

If you heard a large clanging noise this past Sunday night, it was probably the sound of my arteries slamming shut. I took a page from Maggie's book and decided to make mac and cheese as a post-Valentine's Day-Valentine meal; I knew full well that it was going to be a cholesterol nightmare, but I threw caution to the wind and went for it anyway. If you are looking for a lighter or lower fat mac and cheese, this is not the recipe for you. Consider yourself warned.

So! What made this macaroni so crazy? Well, let's start with a solid pound of grated cheese (four kinds). And then move on to the quarter pound of prosciutto. And from there, to the caramelized shallots and two heads of roasted garlic.

Hungry yet?

cheese

Just devising this recipe made me drool like some prehistoric beast; I certainly growled like one once or twice as I assembled it--I lost some quality acreage on my knuckles while grating the cheese. I based the recipe on one that I found in Bon Appetit last month; I was intrigued by their tip to use eggs instead of bechamel for the custard. Though it took some care to achieve (you have to be very careful when mixing the eggs and the cheese sauce if you want to avoid scrambled eggs), it was worth it--the casserole was cheesy, gooey, creamy deliciousness from top to tail, without the trauma of whisking hot milk into flour (though the addition of some tangy buttermilk to the cheesy custard certainly didn't hurt the cause, either).

The topping might have been my favorite part, though--breadcrumbs with parmesan, garlic, and a hint of nutmeg, just to keep things interesting. It's a flavor that most will find hard to place, but it adds a lovely complexity.

Basically, this is a panful of cardiac arrest--and worth every single bite. Make it for someone you love (especially if that someone is yourself) today.

Death mac: Four cheese mac and cheese

1/4 stick butter
6-8 medium sized shallots, sliced thinly
1/4c all purpose flour
1 1/2 c buttermilk
2 c milk
1 lb shredded cheese (a good mix: parmesan, gruyere, manchego, cheddar)
1 tbsp dijon mustard
6 oz pancetta or prosciutto, diced
2 large eggs
2 heads roasted garlic, pureed

1 lb shell pasta (I used whole wheat in an attempt to be...um. Healthy. Yeah.)

Topping
1/2 c breadcrumbs
1/2 c parmesan cheese, grated
2 tbsp onion powder
2 tbsp garlic powder
1/2 tsp nutmeg
salt
  1. Heat the butter in a large skillet over medium-low heat. Add the shallots and saute until caramelized.
  2. Add prosciutto/pancetta; saute for 3-4 minutes more
  3. Add flour, cook for 2 more minutes
  4. Add milk; bring to a simmer
  5. Add cheese, mustard, and garlic puree. Continue to simmer until cheese is melted. Season to taste with salt
  6. Whisk eggs into medium bowl; gradually whisk in 1 c cheese sauce. GRADUALLY is key--you don't want the eggs to curdle
  7. Add egg mixture back into cheese sauce
  8. Meanwhile, preheat the oven to 400 and cook the pasta in salted water according to package directions.
  9. Prepare topping: breadcrumbs, parmesan, onion and garlic powders, salt.
  10. Add cooked pasta to sauce; turn out into buttered casserole dish.
  11. Top with breadcrumb topping.
  12. Bake 25 min or so, until everything is bubbly and brown and irresistible.

Tuesday, February 17, 2009

Marc Meyer's Five Points Mac and Cheese


I am one of those people who gets dish envy at restaurants. And orderer's remorse. Hopefully, if we go to a restaurant together, you know me pretty well, so you won't be shocked if I ask for a taste of whatever you have that looks so good. And if I ultimately steal your plate and finish every last morsel.

Recently, we went to Five Points restaurant with a large group for brunch. Almost everyone ordered something different, and soon the plates were passed around for tastes. My friend Lindsay had brought along her younger sister, whom I'd never met. But of course I found myself scarfing down the remains of her macaroni and cheese. It was just. So. Good. Crazy-creamy with a strong cheese bite, a rich-but-not greasy or gluey sauce that kept each noodle moist. Divine. I tried to memorize each flavor, which clearly required more than one delicate spoonful. For the good of mankind, right?

So far, Marc Meyer's brunch book had not steered me wrong. His frittata method is great, and the lemon-ricotta pancake recipe has allowed me to faithfully duplicate the Five Points dish to a tee. Why would this be any different?


The ingredients are inspired. His secrets are canned evaporated milk and a block of cream cheese that melts into the sauce. Sharp cheddar and/or gruyere. Good milk and a touch of cream with quite a bit of freshly grated parmesan stirred in. If it worked, this would be my new favorite recipe for the classic dish—no whisking flour into a bechamel! I have been trying to perfect my macaroni and cheese for a long time: I've tried baked and broiled, cheese sauce and simple white sauce, a thousand variations. I have faith in Meyer's ingredients.

But it didn't work as written in the cookbook, so I'm not giving you the recipe yet. I want to play with the proportions first—as soon as we can stomach more mac and cheese. Scaling down restaurant recipes is tricky. Perhaps the sauce quantity needs to be doubled, perhaps more. The sauce looked great, but after baking as instructed, the dish was dry, lacking the creaminess of the restaurant version.

Stay tuned.

Monday, February 16, 2009

Too much is never enough: Black forest cookies.

cookies

Get six bakers in a room and you will get six different opinions on what makes The Perfect Chocolate Chip Cookie. For me, it's got to be chewy, and soft, and (of course) so chocolatey you could implode. I mastered a certain form of chewy while I was in high school--though, what I considered "chewy" was really just, you know. "Undercooked." Which is fine for me, because I am a huge fan of cookie dough; it is not, however, (necessarily) appropriate when one is going to be sharing the cookies with anyone but their fellow dough-hounds. So, a few years ago, I embarked on a great quest to figure out how to make cookies that...well...cook (without being crunchy).

My journey took me to many places: the land of extra baking powder, the thicket of shortening, the back alley of egg-whites-only. Some truly dark, dark places. In the end, the answer wound up being simpler than I could have imagined: refrigerate the dough, and keep it cold. Alarmingly obvious, right? Of course, it makes perfect sense: the cookies I tend to favor are at least 40% butter; if you put it in the oven when it's already started to melt (this applies also to hot cookie sheets--be sure to cool yours for a few minutes between batches!), you're kind of cruising for a bruising.

My journey ALSO took me to a wonderful land: the land of the black forest cookie. Much as I love the traditional chocolate chip cookie, there's only so many times I can make the exact same recipe (in the name of science, of course) before I feel a deep and abiding need to mess with it. In this case, I started thinking that there simply wasn't enough chocolate involved in the chocolate chip cookie, and that it was my moral obligation to sort that out--enter the cocoa powder and the two kinds of chips. Of course, such a decadent disaster was not for the untrained palate; all that chocolate could kill someone without the appropriate background. So, I opted to cut the sweetness a little by throwing in some nice, tart dried cherries. It was at that point that the stars aligned, the heavens opened, the angels sang, and I was fairly certain I was on to something.

And then Bench ate an entire batch in one sitting, and I knew it for sure.

The texture on these things is impossible to explain; they're chewy, sure, but also somehow velvety. They're cohesive, but have a delightful crumb. They're great in milk, and great shoved into your mouth fistfuls at a time.

Try these. Seriously.

Black forest cookies

2 sticks butter, softened
¾ c sugar
¾ c brown sugar
2 eggs
2tsp (or more) vanilla
2 ½ c flour
1 tsp baking soda
½ tsp salt
¼-1/2 c cocoa powder
12 oz chocolate chips (a mix of white, milk, and dark)
1/2 c dried cherries, chopped
  1. Preheat oven to 375°F. cream together butter and sugar
  2. Add eggs then vanilla.
  3. Sift together dry ingredients; slowly mix in to butter mixture.
  4. Chill batter for approximately one hour. Drop on to ungreased cookie sheets (about a dozen per sheet), chilling batter between batches.
  5. Bake for ten minutes. Remove from pan to cool. Be sure to rinse the pan in cold water between batches--you need it to be cool when the batter hits it.

Wednesday, February 11, 2009

Barbecue While You Shop: Slow Cooker BBQ Ribs


I don't mean you can make ribs in the oven or grill while you shop online. You can, but this is better. The weather is great for a minute! Go outside!

These ribs cook while you're gone at work, while you're asleep, while you're hanging out with your kids, or while you're wandering Soho, checking out the sales at the art supply store and Sur la Table. I highly recommend the latter. (Though I think I managed to buy the only thing in there that wasn't discounted.)

I really think slow cookers are worth the counter space, especially for busy folks. And I have precious little counter space. A lot of people have visions of mushy stews and everything tasting the same when it comes out of the crockpot, but really, anything that you braise can be slow-cooked, especially if you're willing to do a little prep work.


They may not be for the purists among you, but for the rest of us, these ribs are tasty, and cheap, and easy. Isn't that a worthy trifecta?

Slow Cooker BBQ Ribs
Serves two

1 full rack pork spare ribs, trimmed and cut in half
1 teaspoon paprika
1/2 teaspoon garlic powder
1/2 teaspoon chili powder
2 oranges
1 lemon
2 bottles of beer
1 dried chipotle pepper
1 18-oz (or so) bottle barbecue sauce (I recommend Stubb's)
hot sauce for serving

Rub ribs with paprika, garlic powder, and chili powder. If you have time, refrigerate after rubbing for 1-3 hours. Zest oranges and lemon. Juice oranges and lemon, adding juice to the slow cooker. Crumble chipotle and add to slow cooker. Bring ribs to room temperature if you refrigerated them. Brown each half of the rack of ribs on both sides in a heavy skillet. Add first half to slow cooker, pour a little barbecue sauce on top, then add second half. Add beers, then top off with more barbecue sauce. Add about 3/4 of the bottle of barbecue sauce total. Ideally ribs will be just submerged in liquid. If you have time, cook ribs for 10-12 hours on low. This way they will be most tender. If not, cook for five hours on high. Remove ribs from liquid (discard liquid), serve with the rest of the barbecue sauce and hot sauce.

If you're preparing these overnight, refrigerate ribs submerged in the cooking liquid (in a casserole, not your slow cooker insert) during the day. Before heating, remove fat from surface. Reheat in the oven, finishing with a quick broil to crisp them up if you want.

Tuesday, February 10, 2009

Simplicity itself: Honey mustard salmon

salmon

Lean in, I'll tell you something: this dish is my secret weapon.

Honey mustard salmon! It's simple, it's elegant, it's delicious. It's also ludicrously easy to make, and (incidentally) has been the star player in every successful seduction of my adult life, platonic or otherwise. I bring this up only because it's the week before Valentine's day, and if I were not going to be playing a show on the day itself (shameless plug 9pm at the National Underground, for all you New Yorkers! Ask for Autobahn da Fe! www.autobahndafe.com /shameless plug ), this is the dinner I would be making for Bench to usher in another year of his fealty happiness and harmony. I typically pair it with roasted asparagus, but it really plays well with most vegetables; most recently, I paired it with cauliflower and purple potatoes.

Aside from being texturally unimpeachable and just generally delicious, this dish has two major things going for it:
1. It has precisely four ingredients, including the salmon.
2. It takes approximately 45 seconds to assemble.

It's really the perfect meal for those days when you want to make an impression but have a thousand other things to take care of before you can do so. Go ahead and clean the bathtub! Run to the bank! Go to the nail salon! Live dangerously! All you need is ten to fifteen minutes to get this dish from fridge to plate (if you're using filets; slightly longer if you adapt it for a bigger slab o' fish), so you can get home (or emerge from your lair) with as little as twenty minutes to go time (I'm giving you an extra five minutes to actually round up the ingredients in your pantry). Your date will be putty in your perfectly manicured hands. I am not kidding. Putty.

Be sure to make him/her do the dishes.

Honey mustard salmon

2 salmon filets

1/4c honey
1/4c wholegrain mustard
1 tbsp soy sauce
  1. Preheat your oven to 400 degrees
  2. Mix the honey, mustard, and soy sauce.
  3. Coat the salmon with the glaze
  4. Put the salmon in a roasting dish and whack it in the oven until the center is opaque (5-10 minutes, depending on how rare you like it. I prefer it pretty much still flopping around, so I tend to give everyone else's portions a 3-4 minute head start before putting mine in.)

Sunday, February 8, 2009

Adventures with Kaffir Lime: Green Curry Stir Fry

Hey readers! We've moved! Please come check out the new site over here!


I think one of the greatest gifts of a city as big as New York is that even long-time residents can discover new things here. Not just new restaurants opening every day but treasures that have been hiding, tucked down a little street or just one subway stop farther, for years and even decades. I love how new the city continues to be to me, even five years in.

One of my best friends recently returned from three amazing weeks on honeymoon in Thailand. They sunbathed and explored and took a cooking class that included a guided tour of the unfamiliar fruits and vegetables of an outdoor market as well as instruction on ten thai specialties. I am jealous, to say the least. Upon her return, she imparted this bit of wisdom to me: "Thai cooking," she said, "isn't especially hard, in terms of technique. You really just need the right ingredients."

That was enough for me to finally get in gear. I knew there was a Thai market in Manhattan's Chinatown. I think I even poked around it once several years ago, on a Chinatown trip during which my roommate bought two teeny-tiny (probably illegal) turtles. She was determined to race them in the bathtub of our first apartment. At the time, I wasn't ready for kaffir lime leaves.

But older and wiser, I looked at a map and wandered down below Canal to a quiet stretch—a steep block that I hardly remembered was there. My walking companion worried that we were lost. But there it was. Dreaming of the flavors of green curry, I returned to Bangkok Center Grocery determined to find the right ingredients, the real stuff. The shop is tiny but packed with goodies. The sweet young man who was minding the store pulled kaffir lime leaves from the refrigerated section for me, and I scored a knob of galangal and a bunch of thai basil—they even had two different kinds!


The scent of kaffir lime leaves is transporting. Fragrant doesn't even begin to describe it. Track some down where you live, and soon. Toss the paired leaves (they remind me of stick-on mustaches) in a pan with veggies of your choice and they'll infuse your dish with musky lime flavor with a hint of bay. The leaves enliven jarred curry paste and elevate an everyday stir fry to something special.

It's no honeymoon in Thailand, but it did make me appreciate my city.


Green Curry Stir Fry
Adapted from Ken Hom
Note: this is really just a method, good for whatever stir-fry ingredients you are craving. Feel free to adapt further with other vegetables or add meat.

1.5 tablespoons vegetable oil
2-3 tablespoons Thai Green curry paste (I used Thai Kitchen brand, but you can also make your own.)
1 large onion, sliced
1 block tofu, pressed to rid of excess liquid and cut into squares
1 tablespoon prepared lemongrass (from a jar)
3 tablespoons chopped garlic
1 tablespoon finely chopped galangal or ginger (I actually prefer ginger and find galangal a little mustardy)
4 kaffir lime leaves
1 tablespoon fish sauce
2 teaspoons sugar
1/2 teaspoon salt
1 large globe eggplant or 2-3 japanese eggplants, sliced in one inch slices
2 carrots, sliced in 2" long, thin planks
1 small can bamboo shoots
14 fl oz can coconut milk (I used light)
3 tablespoons water
1 small can water chestnuts, sliced
2 red peppers, sliced
large handful fresh thai basil leaves
lime wedges for serving

When the vegetables are sliced, heat a wok or large frying pan (sometimes I do both so as to not crowd the vegetables and steam them) and add the oil. Make sure it's quite hot. Add the green curry paste and stir-fry for two minutes, then add the tofu and stir fry for another minute. Add the onions, lemongrass, garlic, galangal or ginger, kaffir lime leaves, fish sauce, sugar and salt, and stir fry for another 2 minutes. Add the eggplant, carrots, and bamboo shoots and stir fry one minute, then add coconut milk, water, water chestnuts and red peppers. Turn the heat down and simmer for 20 minutes or until eggplant is cooked and silky. Stir in basil leaves and serve at once.


Thursday, February 5, 2009

Less tang, more character: Mushroom risotto

risssssssotto

When I was but a wee whippersnapper and newbie to the world of cooking, the first "complex" dish I undertook was risotto. This was right after Jamie Oliver's first cookbook came out, and people were starting to figure out that you could actually make this crazy stuff at home! Of course, with that knowledge came plenty of grousing, largely about how tiiiiiiiiiiiiiiiiiime consuming it was, how teeeeeeemperameeeeeeeeental it was. You know the drill. Naturally, this wave of petulance and frustration attracted me to the dish like nothing else (you may have noticed a behavioral pattern here): it was hard, which meant I had to master it! Of course.

The part that confused me: it wasn't that hard at all. It wasn't that persnickety. Yes, it was time consuming, yes it required a certain amount of my attention. But as I discovered (to my extreme surprise), risotto is ultimately a pretty simple basic formula (rice, liquid, patience), which you can then dress up any way you like. The first risotto I made featured goat's cheese and dried cranberries; since then, I've come up with several lovely variations that I pull out on various occasions, including the mushroom variety I whipped out the other day at dinner for our lovely friend Claire.

onthestove

I'm particularly fond of this risotto because it is so light--the original recipe doesn't even call for any cheese (though, really. Like I'm going to skip the cheese. Come on. But it can be done!)--but so incredibly flavorful that it feels terribly indulgent. I am inclined to credit the inclusion of the liquid trifecta (a combination of marsala or madeira, white wine, and stock) that is used to pull out the creamy starch in the rice; it's unexpected and subtle, but adds a certain sweetness (as do the peas) that complements the meatiness of the mushrooms.

I won't lie: you do need to be kind of vigilant. To get the right consistency, you will need to stand at your stovetop for 40 minutes or so, gently massaging the starch out of the rice (emphasis on gently) and plying it with liquid. But, it's not a complicated endeavor--you can quite merrily drink wine and chat with guests while you do it, as it won't really require a great deal of concentrated focus. Your guests, however, will not need to know that. I encourage you heartily to let them think that you are, in fact, the most brilliant multitasking chef-host-genius ever to walk the earth. No one will dare question your bold statement once they taste this stuff.

Mushroom Risotto

1c arborio rice
2 large portobello caps, cut into pieces 1/2"x1/2"
6oz shiitake mushrooms (stems removed and reserved), coarsely chopped
6oz white button mushrooms (stems removed and reserved), finely chopped
2 shallots, chopped fine
1c frozen peas
1 head garlic (roasted and pureed)
2 tbsp butter
2 tbsp olive oil
1/2c grated parmesan cheese

1c marsala wine
1c white wine
2-3c stock (ideally, a combination of mushroom--which you can make by simmering the stems you reserved above in some water--and chicken)
  1. Saute the mushrooms in 1 tbsp oil, 1 tbsp butter on medium-low heat until reduced in size by approx 2/3. Deglaze pan with slug of marsala wine, set liquid aside.
  2. Saute the shallot in remaining butter and oil (and some salt) until shallots are golden
  3. Add rice, stir until coated with oil and translucent (about 1 min)
  4. Turn up heat to medium, add 1c of the stock and stir until all absorbed.
  5. Add the cooked mushrooms and garlic puree.
  6. Add the remaining stock and wine, 1 cup at a time, until the rice is soft and creamy.
  7. Add peas and cheese. Cover and set aside for 10 mins or so. Serve with a shaving of parmesan on top.

Tuesday, February 3, 2009

More Winter Citrus: Meyer Lemon Pasta with Seared Scallops


A craving hit about 4pm. There was no way around it. I needed Meyer lemons, and nothing else would do. They'd be perfect in Amanda Hesser's recipe for creamy lemon pasta with arugula. Imagine my delight when the first display in Whole Foods was a basket full of lemons and a big sign—Meyer lemons on sale! I happily snagged two...or so I thought.

In the grocery store, I often give myself permission to alter recipes beyond recognition. Creme fraiche is three dollars and packed with fat—no problem, I'll use Fage yogurt! Real parmesan and arugula beyond my budget? (And I often feel like cooked arugula is a touch too bitter.) No worries, we have other hard cheese and vegetables at home. This continues until I have pretty much nothing a recipe calls for, except those precious Meyer lemons.

People who don't live in New York may not have to wait in line 20 minutes to buy groceries. But that is not a rare occurence here, and I guess I'm getting used to it. The line at Trader Joe's snakes around the entire store, and Whole Foods is a madhouse at prime hours. We have tiny refrigerators. We shop daily. So we wait in line with everyone else. When I finally reached the checkout counter, there was no turning back.


To my dismay, it turned out some of the lemons nested in that display, despite any signage to the contrary, were NOT Meyer lemons at all. I was heartbroken. I should have looked closer when I grabbed them. But with one tiny Meyer lemon, and one boring Eureka lemon, I had to soldier onward.

What I'm saying is this: this slightly disappointing meal was not Amanda Hesser's fault. You should probably try her recipe, not mine. And you should check your lemons carefully before you wait in line.

The sauce wasn't quite creamy or lemony enough. The peas and scallops didn't really integrate together, and though each element was nice enough, it just didn't cohere. But there is potential in this one, it's worth trying another variation. A little salty proscuitto would certainly help. Or follow the recipe exactly for once.


Meyer Lemon Pasta with Seared Scallops
Adapted from Amanda Hesser

1 pound angel hair pasta
4 scallops per person
1/2 cup grated hard cheese + additional for serving
2 Meyer Lemons (I only had one, but you really should use 2)
1 cup frozen peas, thawed according to package directions.
3 slices proscuitto, in 1 inch pieces (recommended)
1/2 cup greek yogurt (or creme fraiche)
salt and pepper to taste

Zest the lemons and juice one of them. Bring a large pot of salted water to a boil for pasta and prepare pasta (al dente) according to package directions. Remove small side muscle from scallops and discard. Heat a cast iron pan on high heat with a bit of olive oil. Salt and pepper scallops. Sear scallops to desired doneness (about 2 minutes per side, depending how hot your pan is.) Remove scallops and toss proscuitto strips briefly in hot pan. When pasta is cooked, reserve one cup of the pasta cooking water and drain pasta. Return pasta to cooking pot, add back in pasta water, yogurt, and toss to coat. Add lemon juice, zest, proscuitto strips, cheese, and peas, stirring and tossing to distribute sauce. Add salt and pepper to taste. Serve with scallops on top.

Monday, February 2, 2009

Sunshine in a bowl: Triple garlic chickpea soup

soup

In my neverending quest to poke Winter in the eye, I have three stalwart friends: sharp cheese, sunny citrus, bright garlic. The holy trinity of deep winter, if you will. Rare, however, is the occasion where I manage to give them all equal prominence; usually one will take the wheel while the other two bicker in the backseat. So, I'm sure you can imagine my thrill when I devised a recipe that allowed all of them to shine equally.

I was inspired by Orangette's chickpea salad, a quick recipe that, in its simplicity, transforms the humble ingredients to something ethereal in its deliciousness. It being Winter, I decided to transform it from a salad to a soup; being me, I also opted to chuck in plenty of garlic, done up three ways: roasted, sauteed, and raw (I know, I know--raw garlic sounds kind of scary; but I promise you, it just adds a wonderful sharpness to the flavors).

chickchickchick

The triple garlic action gave the soup a wonderfully heady, complex flavor (at once mellow and sharp), while the parmesan imbued a creamy saltiness that balanced it perfectly. The lemons sang without screaming. All the flavors were present and accounted for, clear without being overwhelming.

Next time, I think I might add a bit of sauteed pancetta--I think the salty chewiness of it would accent the rest of the flavors beautifully--but I would not go so far as to say that this tangy bowl of sunshine NEEDS such an accent; I'm just a little greedy that way.

Triple garlic chickpea soup

3x15 oz cans chickpeas, rinsed and drained
2 heads garlic (1 roasted, one separated into cloves, peeled and sliced)
1/2c shredded parmesan cheese
juice and zest of 1 lemon
1-2 medium sized onions, peeled and diced
2 quarts water or stock
  1. Preheat your oven to 350.
  2. Slice the top off one of the heads of garlic; drizzle it with olive oil and wrap loosely in foil. Meanwhile, rinse and drain one of the cans of chickpeas; toss with some olive oil and salt and place on a rimmed baking sheet. Bake until the garlic is soft (about 1 hour) and the chickpeas are golden but not burnt (about 20 minutes)
  3. Meanwhile, heat some olive oil over medium-low heat in a heavy-bottomed saucepan; saute the onions until translucent and then add half the sliced garlic. Sautee for another minute or two, until everything is extremely aromatic.
  4. Add the remaining two cans of chickpeas to the saucepan and let cook for a moment with the onions.
  5. Add the water (or stock); bring to a boil then reduce heat. Add salt and pepper to taste.
  6. Add lemon juice, parmesan cheese, roasted garlic, and the remaining garlic.
  7. Using a hand blender, puree the soup until a nice smooth consistency, adding more water/stock if it seems too thick
  8. Add roasted chickpeas
  9. Serve with a garnish of lemon zest and parmesan cheese.