
Hello, amigos!
Big news here at Pithy and Cleaver--we're moving!
That's right! We've packed our bags and headed on over to www.pithyandcleaver.com
We hope you'll update your blogrolls and join us at our new home!
Love,
Maggie and Shiv
Tuesday, March 24, 2009
Sunday, March 22, 2009
Spiking Dessert: Eggless Tiramisu with Marsala and Kahlua
Hey readers! You can check out this post on the fancy new Pithy and Cleaver! Just head over here!

Everyone is writing about Twitter these days, perhaps because it's really happening, or perhaps because everyone wants to figure out what the heck it's good for. Quick answer: it's great for wasting time. But I've also found that Twitter is a pretty interesting way to connect with people I may not have gotten to chat with otherwise, as well as a chance see a behind-the-scenes look at bloggers I admire. And it's a useful forum for asking for advice on recipes and restaurants.
I was daydreaming about dessert when I asked my twitter-people (tweeps? Are we really calling them that?) whether they had any tips on tiramisu ingredients or technique. The kind person who contributes to Twitter for Everyday Food magazine responded, volunteering an easy recipe for me to try. How cool! But to me, their recipe just isn't the real thing. These days, mascarpone is easy enough to find (especially in New York) so there was no way I was substituting a bar of reduced-fat-cream cheese. I wanted to grate some nice dark chocolate into it, too, not just use cocoa powder. Instant espresso isn't really my game (it just tastes off to me, even in baked goods) and the recipe didn't call for any alcohol!

We here at Pithy and Cleaver don't mind baking with booze. Shiv did invent a Mint Julep Pie, after all. I was further encouraged when I stopped at the farmer's market for a bottle of fresh cream. The woman from Milk Thistle Farm who sold me a bottle of lovely heavy cream offered her advice: for that true sophisticated tiramisu taste, I should go to a nice liquor store and buy a decent bottle of marsala. It just wouldn't be the same without it. "One last thing," she warned. "Don't soak the ladyfingers too long. And don't overbeat the cream, it's so full of milk fat, it will turn into butter."
Trying not to think of the giant tub of near-butter I was about to serve my unsuspecting guests, I headed for the liquor store with a plan. For this grown-up tiramisu, there would be not one, but two kinds of booze. Good freshly whipped cream, good chocolate, real coffee (spiked with Kahlua!) and real mascarpone, with a touch of marsala. Decadent, for sure.
And really delicious. Like, eye-rolling, expletive-dropping delicious.

This is the perfect dessert for company, since it requires no oven and must be assembled a few hours ahead. It's dramatic looking—your guests will be so impressed, they cannot imagine what a breeze it was to put together. It's rich, but not cloying. Traditionally, tiramisu has raw egg yolks in it, but this eggless version is worry-free. And don't be scared of all the alcohol, the taste is just sophisticated, not too potent.
Eggless Tiramisu with Marsala and Kahlua
serves 9-12
2 cups very strong decaf coffee or espresso, cooled
1/3 cup plus 1 T sugar, divided
3 T Kahlua
2 cups mascarpone
3 T Marsala wine (unsalted-buy at a liquor store, not "cooking wine")
36 savoiardi (Italian ladyfingers)
1 1/2 cups very fresh heavy whipping cream
small bar good-quality dark chocolate for grating (I used four Valrhona 70% cocoa feves)
Prepare layering ingredients: chill a large bowl and the beaters of an electric mixer (a hand mixer is fine.) Prepare coffee and let cool in a wide-low dish (a loaf pan or baking dish works well.) Add 1 T sugar and the Kahlua, set aside.
Place mascarpone in a large bowl. Fold in reminiang 1/3 cup sugar and marsala. Using chilled bowl and beaters, whip cream until soft peaks form. Do not overwhip! Gently fold half of the cream into the mascarpone mixture, then add in the rest, folding carefully until just mixed.
To assemble tiramisu, have 8 1/2" trifle bowl (or other straight-sided serving bowl) next to coffee mixture. Dip savoiardi one at a time into coffee mixture briefly-count "One" as you dip one side, then turn and count "One" before removing. Place in bottom of bowl until a layer is formed (You may have to break a few ladyfingers before dipping to evenly fill bottom layer. When bottom of bowl is covered, carefully add about a quarter of the mascarpone and cream mixture, smoothing the top with a spatula. Grate chocolate on top, evenly covering the cream (you should still be able to see the cream through the chocolate.) Cover with another layer of soaked savoiardi, then another layer of cream, followed by chocolate shavings, repeating until you have four layers and all your cream has been used up. Wrap well with saran wrap and refridgerate at least two hours before serving. You can wait overnight, but the whipped cream condenses a little.
Thursday, March 19, 2009
The Old Fashioned Way: Nicole Rees's Simple Cream Scones
 Hi readers, we've moved!
Read this post, and new ones, at the new Pithy and Cleaver! Thanks for updating your book marks. We hope you like the new design.
Living in a 450 square-foot apartment is tricky if you love to cook and bake. Wall shelves help, as does a freestanding counter island. Baking pans are stacked in unnatural positions and wedged in tiny cabinets, and we have a bread board hanging on a nail on the wall. Luckily, we did manage to find an apartment with a dishwasher—though it's insalled directly under the sink, rendering it impossible to rinse dishes and put them into the dishwasher with any sort of grace. Needless to say, we don't have lots of big kitchen appliances.
Every time I read a cooking magazine or pick up a new cookbook, I am reminded of my longing for a food processor and (sigh) a Kitchenaid mixer. So many recipes call for these tools without explaining any alternatives. That's why I was so excited to receive a copy of Baking Unplugged from the kind folks at Wiley publishing.
In Baking Unplugged, Nicole Rees provides recipes for old-fashioned treats that don't call for any fancy equipment. With a whisk and a spoon (and a few other low-tech tools you probably already own), she makes breakfast treats and old-fashioned desserts to satisfy a sweet tooth. The yeasted cinnamon rolls sound amazing, as do the lemon squares with grated hazelnuts in the dough. (That one is very high on my to-make list.) Her directions are simple and clear, though I do wish there were pictures of the finished dishes. A long introduction explains baking down to the simplest techniques and ingredients: she wants to impart all the knowledge of old-fashioned baking the way your great-grandmother might have done.

Many of Rees's techniques and tricks for baking by hand make perfect sense, and I wish more cookbook and magazine writers would follow her lead and at least mention how a dish might be made without a mixer. Besides, it is kind of satisfying to put a dough together the old fashioned way. However, I'm unlikely to follow her all the way down this road. Whipping cream with a cold whisk may be possible, but I'm not that eager to try when a small electric hand mixer can do the job in a fraction of the time. (And without the arm cramp.)
I had never made scones before attempting the recipe in Baking Unplugged, and I was amazed at how quickly they came together. You could easily bake these in the morning before friends came over for tea or brunch. (Though they can also be frozen and rewarmed with decent results.) Straight out of the oven, they are trancendental. They're simple, tender, and flaky, with none of the off, stale flavors you find in coffeeshop scones (plus, a fraction of the cost!)
I used local cream from the farmer's market for this recipe, which I highly recommend. Because the scones have more cream than butter, and no other flavorings to distract you, the taste is one of farm-fresh dairy. They're not greasy at all. They were a touch too sugary for my liking—perhaps this is what the author means by "retro" baking. I'll scale down the sugar a tiny bit when I make them again (and watch the sugar in other recipes in the book.) I just may not have quite the same intense sweet tooth as Nicole Rees. But I'm glad her sweet tooth guided her toward writing this book.
Cream Scones
From Baking Unplugged by Nicole Rees; Wiley 2009
Makes 8 scones
2 cups all-purpose flour
1/4 cup sugar (I would consider a little bit less)
2 tsp baking powder
1/4 tsp salt
1 tsp vanilla extract
3/4 cup heavy whipping cream plus 2 T for brushing
1/3 cup cold unsalted butter, cut into 1/2" pieces
sugar for sprinkling (crunchy turbinado sugar would be good)
Preheat the oven to 375°. Stack two baking sheets together and line the top one with parchment paper. In a large bowl, whisk together the flour, sugar, baking powder, and salt. Stir the vanilla extract into the heavy cream. With a pastry blender, cut the butter into the flour until a few pea-sized lumps remain. With a fork, gradually stir in enough of the 3/4 cup heavy cream until the mixture just starts to come together. Turn the dough out onto a lightly floured surface and very gently pat into an 8" round about 1 1/2" high. Using a chef's knife or bench scraper, cut the dough round into 8 wedges. Transfer the wedges to the baking sheet, spacing the scones at least 1" apart. Brush the tops with the remaining heavy cream and sprinkle liberally with sugar. Bake in the top third of the oven for 15 to 18 minutes or until the tops are golden. Transfer the scones to a wire rack to cool slightly, 3 to 4 minutes. Serve warm with jam.
PS: I've added the book to our Amazon sidebar over there --------> so you can pick yourself up a copy.
Tuesday, March 17, 2009
My One and Only: Salmon with Soy-Honey and Wasabi Sauces
 Dear readers: please come see us at the Newer, Awesomer Pithy and Cleaver. Click here to see this salmon on the new site!
There are plenty of foods I'll experiment with. I'll tinker with tomato sauce, I'll riff on risotto. But for me, no salmon recipe can unseat this one as my favorite. (I'll admit, I haven't yet tried Shiv's Seduction Salmon with Honey Mustard.)
Before we moved to Oregon and became flannel-wearing Northwesterners, I don't remember eating much salmon. As soon as we got settled, though, my mother was grilling it up (in the rain) with the best of them.
This recipe, for me, is the taste of home. It reminds me of my parents' dinner parties, during which our little dachshund would attempt to steal a napkin from some unsuspecting guest's lap and shred it to bits. (And then eat it, which was a pretty bad idea.) The salmon was served with a big salad and crusty loaves of bread, sometimes a dish of couscous with raisins alongside. Giant, thick filets of fish were consumed—even those who didn't plan to take seconds always did. It's hard to keep from licking up any remaining sweet soy-honey sauce from the plate. Whenever Matt and I travel west to see my folks, this is the dinner we request.

My mom has actually moved on to a new recipe, and that's fine, but this is the one for me. If you have a grill, you can cook the fish quickly outside, but if you only have a broiler, that works just as well. It isn't too smelly, I promise. Just be sure to leave it quite rare, like true Northwesterners do.
Salmon with Soy-Honey and Wasabi Sauces
Gourmet, May 2001
Serves 4.
If you're only serving 2, I would still make all the sauce, since it's delicious.
For salmon
1/2 cup sake
2 tablespoons soy sauce
1/4 cup rice vinegar (not seasoned)
1 tablespoon finely grated peeled fresh ginger
1 6 to 8 oz piece thick salmon fillet per person
For sauces
2 tablespoons soy sauce (I use reduced-sodium)
1/4 cup honey
1 tablespoon fresh lime juice
2 teaspoons wasabi powder
1 tablespoon water
Lime wedges for serving
Briefly marinate salmon:
Stir together mirin, soy sauce, vinegar, and ginger in a shallow dish. Add fish, skin sides up, and marinate, covered, at room temperature 10 minutes. Preheat broiler.
Make sauces: Boil soy sauce, honey, and lime juice in a small saucepan, stirring frequently, until thickened, about 4 minutes. For wasabi sauce, stir together wasabi powder and water in a small bowl.
Broil fish, skin sides down, on oiled rack of a broiler pan 5 to 7 inches from heat until fish is still pink inside, 5-6 minutes. Do not overcook! Serve salmon drizzled with sauces, with lime wedges for squeezing.
Soy-honey and wasabi sauces can be made 2 hours ahead and kept, covered, at room temperature. Salmon is good with lightly steamed/sauteed vegetables (pea shoots, asparagus, shitake mushrooms) tossed with a tablespoon of hoisin.
Monday, March 16, 2009
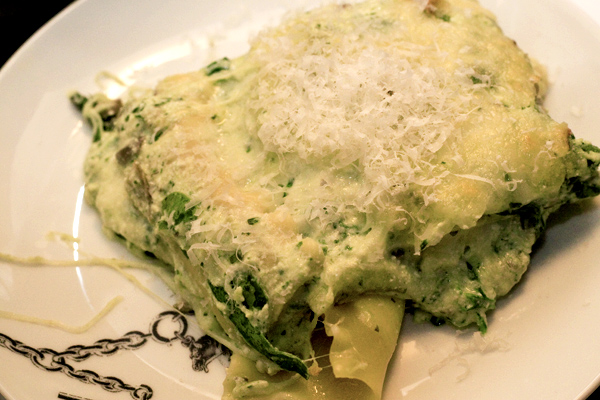
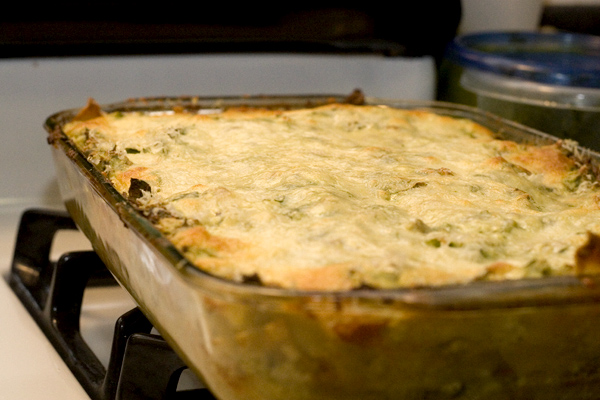
A guaranteed crowd-pleaser: Pesto lasagna with spinach, mushrooms, and artichokes
Given that I am a total misanthrope, it comes as a surprise to some how much I love entertaining. Ever since I figured out how to boil water without setting the house on fire (somewhere in my early twenties), I've taken ridiculous pleasure in having my nearest and dearest over for a home-cooked meal. The current flaw in this pleasure: in my tiny Brooklyn kitchen, it's hard to manufacture a meal for more than, say, four people at a time. As such, I am sure you can imagine my initial panic when Bench and I decided to have a dinner party for eight; fortunately for everyone, I had this recipe tucked in my back pocket.
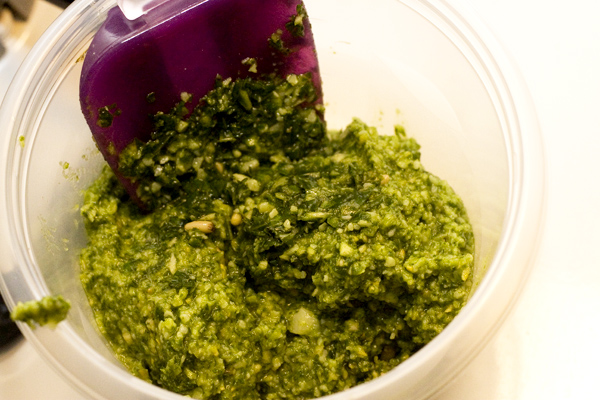
A riff on traditional white-slash-green lasagna, this particular recipe gets a little extra heft from sauteed mushrooms and a whole lot of personality from minced artichoke bottoms (I tried to make this happen with artichoke hearts, but...just...no. Texturally, they just didn't do what I wanted them to; they were too flighty and fibrous where I wanted solid and defined) and about thirty pounds of garlic. Though you can do everything The Hard Way (make your own pesto, wash and chop adult spinach, grate your own parmesan--none of which, seriously, I would have done if I'd known the party was going to be switched at the last minute from Saturday to Friday; totally unnecessary when you're pressed for time), you really don't have to: premade pesto is an excellent way to shave off some prep time, and bagged, prewashed baby spinach makes it almost TOO easy. You can probably even use those lasagna noodles that don't require pre-boiling (which I, being a cowardly sort, have never tried) and you can definitely use pre-grated cheese.
I love serving this at parties for several reasons: it's delicious (obviously), it's impressive, it's easy to assemble, vegetarians will eat it, it multiplies well, and you can do it at a leisurely pace in advance or you can make it in a hurry on a Friday night. Basically, it's my go-to, no fail, always appropriate, guaranteed-to-elicit-queries-for-the-recipe party superstar. My repertoire holds no equal. I hope it's the same for you.
Pesto lasagna with spinach, mushrooms and artichokes
a little oil for the pan
about 16 lasagna noodles
6 oz baby spinach, roughly chopped
8 oz mushrooms, finely minced
15-oz (usually 1 can) artichoke bottoms, minced
2 lbs. (4 cups) ricotta cheese
1 cup pesto
1/3 cup toasted pine nuts (or minced walnuts)
4 large cloves garlic, minced
1 head garlic
1/2 tsp. salt
fresh black pepper to taste
3/4 cup grated parmesan
1 1/2 lbs. mozzarella cheese, grated
- Preheat your oven to 350; slice the top off the head of garlic, drizzle it with olive oil and wrap it loosely in foil. Bake until soft and fragrant (about one hour) (Note: if you are preparing the lasagna in advance, this would be a good time to turn off your oven. If you are NOT preparing this in advance, roast the garlic while you're prepping the rest of the filling and keep the oven hot). Once it's cool enough to touch, squeeze the garlic out of its skin and mash it into a paste. Set aside.
- Set a large pot of salted water to boiling; cook the lasagna noodles for 4-5 minutes (until tender but still al dente). Drain them and lay them out flat on foil or parchment while you get the filling ready.
- Heat some olive oil in a large pan; over medium-low heat, saute the mushrooms with a bit of salt until they have released all their liquid, and then re-absorbed it (about 3-4 minutes). Add the artichoke bottoms and saute for 2-3 minutes more; add the minced garlic and saute for two more minutes. Remove from heat.
- Mix together: ricotta, artichoke-mushroom mixture, pine nuts, roasted garlic paste, pesto, pine nuts and spinach. Set aside.
- Lightly oil a 9x13 pan. Line the bottom with one layer of noodles, then spread 1/3 of the filling over the noodles, followed by 1/3 of the mozzarella and 1/3 of the parmesan. Add another layer of noodles, filling and cheese. And once more.
- Bake for about 50 minutes at 350 degrees; if the top starts to scorch, cover it lightly with foil.
Thursday, March 12, 2009
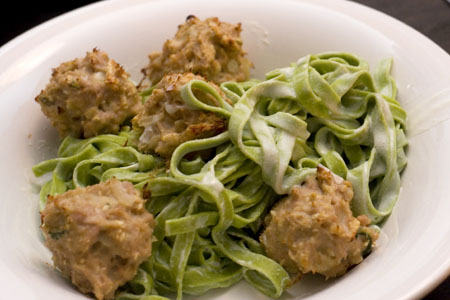
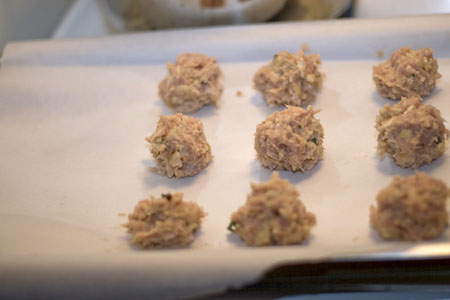
Flirting with disaster: Turkey meatballs for the masses!
It's probably become kind of apparent by now that my general approach to cooking is...well...kind of lax. I rarely measure, I just kind of throw stuff in a pan. Sometimes this works, sometimes this comes back to bite me in the ass. And sometimes, both will happen at once, as was the case when I last made meatballs.
My starting point for these meatballs came from a recipe recommended to me by a lovely friend of mine (who also passed along her secret, awesome twist), a true virtuoso in the kitchen. After seeing her breezy, effortless way with these little delights, I was entranced, and immediately came home to try them. They were an unqualified success, and so I, of course, misplaced the recipe before the evening was over. Never to be seen again. Which meant I was, more or less, SOL when Bench requested a repeat a few days ago. Fortunately, these setbacks have never really stopped me; and so I trotted home, ground turkey in hand, to recreate the magic on a wing and a prayer.
Reasons why (in this particular instance) this cavalier attitude presented a slight problem:
- I messed up my liquid-to-solid ratio and oversoaked the crackers (standing in for the breadcrumbs--this is the secret, and IT IS AWESOME), resulting in a saltine porridge instead of a moist, crumby cracker dough, which meant I needed to compensate by adding vast quantities of additional crackers to dry out the Meat Dough.
- I came home with far more ground turkey than was really necessary. However, in light of problem 1, this turned out to be a blessing.
- I could not remember how to actually apply the heat to these things in order to cook them. Bake? Fry? What temperature? What? (In the clinch, I turned, as I so often do, to Mark Bittmann, who showed me the way when it comes to baking meatballs, turkey or otherwise).
- I failed to add two very important components: Salt and Pepper. Which I realized after I'd rolled out half the meatballs. Re-rolling raw meat=not particularly enjoyable.
Light and lovely turkey meatballs
12 oz ground turkey (or pork; I'll never tell!)
1/4 lb saltine crackers (about one tube if you buy one of the big boxes), crushed
1/2c milk
1 egg, lightly beaten
1 medium onion, diced
2 tsp fresh sage, finely chopped
Salt and pepper
- In a medium-sized skillet, saute the onion in a bit of olive oil until just translucent. Turn off the heat and add the sage; mix thoroughly.
- Meanwhile, moisten the crushed crackers in the milk; don't let them get too soggy! Squeeze out the excess moisture.
- Add the crackers, egg, onions and sage to the ground meat; mix thoroughly. if the mixture is too wet, crush some dry crackers into the mixture until you reach the desired consistency. Add salt and pepper.
- MEANWHILE! Preheat your oven to 350. While it's cranking up, roll the meat dough into balls approximately 1.5" in diameter; place them on parchment-lined cookie sheets. When the oven's ready, bake the meatballs for about ten minutes.
Tuesday, March 10, 2009
Weeknight Entertaining: Port-Braised Lamb Shanks with Coriander, Fennel, and Star Anise
 Hi readers, we've moved!
Read this post, and new ones, at the new Pithy and Cleaver! Thanks for updating your book marks. We hope you like the new design.
Let's say you want to have a special evening. There's a fancy bottle of wine you've been saving, and you've invited a few friends over for a home-cooked meal. You have something to celebrate.
But you don't know exactly what time they're arriving—they could be stuck at work, or their train could take forever to come. If you plan a dish with too many last-minute preparations, you'll be bustling around while your friends relax and catch up. And you clearly don't have time for lots of shopping and complicated prep between the time you leave work and the time they come over. It's a challenge, the weeknight dinner party.
But take a deep breath. There is no reason you can't entertain on a weeknight, even have a truly decadent, enjoyable meal, without any stress. That's what braising is for. Everything is prepared in advance. You can gently reheat these port-braised lamb shanks for 45 minutes or an hour or longer while your guests arrive, while you drink toasts and eat lovely cheese, and the meal will be none the worse for wear. In fact, it will just get better.

It always amazes me how recipes for braised dishes fail to emphasize the value in cooking ahead. Cook for three (or more) hours the evening before your party, and let the pot cool off outside before you stash it in the fridge overnight. The flavors will mingle, and, most importantly, the fat will separate from the cooking liquid. On game day, you skim the now-solidified fat from the surface before reheating. And this dish has plenty. It's quite satisfying to remove it, knowing you're saving your guests from a greasy meal.
So the lamb reheated happily on the stove, and we sipped the wine and ate lovely cheese from Fromaggio in Essex Market. And Matt asked Peter to be his best man in our wedding, and they were both blushing and adorable, and the lamb fell off the bone as I tried to serve it, and it was as tender as can be.
Port-Braised Braised Lamb Shanks with Coriander, Fennel, and Star Anise
Adapted from Bon Appetit, March 2006
Serves 4
2 1/2 tsp ground coriander
2 tablespoons fennel seeds
1 teaspoon freshly ground black pepper
4 large lamb shanks (about 5 pounds)
4 tablespoons olive oil, divided
1 large white onion, cut into 1 1/2-inch pieces
10 garlic cloves, peeled
3 celery stalks, cut crosswise into 1 1/2-inch pieces
2 carrots, peeled, cut crosswise into 1 1/2-inch pieces
1 small leek
3 cups ruby Port
2 1/2 cups low-salt chicken broth
2 1/2 cups beef broth
6 whole cloves
2 whole star anise
2 bay leaves
1/2 teaspoon dried crushed red pepper
The day before the party, prepare and braise the lamb shanks. Measure coriander, fennel, and pepper in a heavy skillet. Toast on medium-high heat until aromatic and slightly darker, about 2 minutes. Transfer to spice grinder or mortar and pestle; grind finely. Rub each shank with spice blend, reserving a tablespoon or so. Sprinkle each shank with salt.
In large pot, heat port to a simmer. Simmer until reduced to about 1 cup, about 20 minutes. Add broth, boil until liquid is reduced to about 4 cups, about 20 minutes. Meanwhile, eat 2 tablespoons oil in heavy large dutch oven over medium-high heat. Add shanks to pot. Cook until brown on all sides, about 20 minutes. Remove to bowl. Add remaining 2 tablespoons oil to same pot. Add onion and next 4 ingredients; sauté over medium heat until vegetables begin to soften, about 5 minutes. Add remaining spice blend and stir 1 minute. Add hot liquid when reduced, scraping the pan and using the liquid to deglaze.
Preheat oven to 350°F. Return shanks to pot. Add cloves, star anise, bay leaves, and crushed red pepper. Cover pot and place in oven. Braise lamb until tender, 2 to 2 1/2 hours.
When cooked, uncover and cool slightly. Remove shanks from sauce, holding on a plate or bowl, and strain sauce. Return shanks and sauce to pot. Cover and keep refrigerated up to two days.
The day of the party, skim fat from top of the dish. Rewarm, covered, in a 350°F for 45 minutes to one and a half hours (until warm) before serving.
Place 1 lamb shank on each of 4 plates (can be served on top of polenta). Season sauce to taste with salt and pepper. Spoon sauce and over lamb and serve.
Monday, March 9, 2009
The department of mycological affairs: Seared tuna with multi-mushroom ragout

The other weekend, we were lucky enough to wrangle a brunch invite from the Lovely A and her man B (huevos con migos cooked up by real live Texans? HELL YES!), and Bench and I were tasked with bringing along some fruit. So, we popped into one of my favorite stores ever, Union Market, to peruse their produce section. En route to picking out the fruit, my eye was caught by the mushroom bar.

Oh man, oh mercy.
They had mushrooms i'd never even SEEN before! Black trumpets! Hedgehog mushrooms! Mini chanterelles! They also had some of the most beautiful oyster mushrooms I'd ever encountered. Needless to say, I stopped in front of that display like I'd walked into a wall of glass. Bench, recognizing the symptoms, just handed me a bag, and with the acquisition of a gorgeous (if GIGANTOR) piece of yellowfin tuna, the evening meal was planned: Seared tuna with multi-mushroom-miso ragout.
I decided that miso was going to be a central flavor in this meal, and so I marinated the tuna in a slurry of red miso, rice vinegar, and sesame oil; the mushrooms were sauteed slow and low with miso, sake, garlic, and honey (low and slow is pretty much my watchword for mushrooms these days), resulting in a tangy, complex, meaty ragout. The tuna was cooked fast and high in my cast iron skillet, its simple seasoning an excellent match for the robust mushroom sauce.
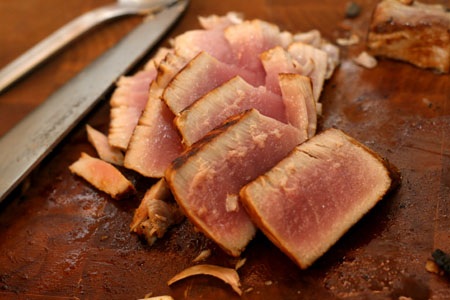
Basically, this was a nice, quick weeknight meal elevated to gourmet ridiculousness with the application of a few specialty mushrooms; it will taste just as lovely with whatever mushrooms you happen to find at your local. This dish is not elitist! This dish does not judge!
Seared tuna with mushroom sauce
1lb nice tuna steak, cut into four portions
1lb mushrooms, sliced (any combination your heart desires! I used black trumpet, hedgehog, shiitake and oyster, but crimini, portobello, button white, or any other combination will work)
2 tsp red miso, divided
1/3c sake
1/4c seasoned rice vinegar
1 tsp sesame oil, divided
2 tsp olive oil
2 tsp honey
2 cloves garlic, sliced
- Make your marinade: combine 1/2 tsp sesame oil, the rice vinegar, and 1 tsp miso in a zip top bag. Mix it thoroughly, add the fish and then refrigerate for up to one hour.
- Meanwhile, make your sauce: over medium-low heat, saute the garlic until it's just aromatic. Add the mushrooms; stir until they've released their liquid.
- Add the miso and the honey. Continue to saute until the mushrooms have re-absorbed their liquid.
- Add the sake and stir until the sauce starts to thicken slightly. Reduce heat to low.
- In a well-seasoned skillet, heat the remaining sesame oil with the olive oil over high heat. Remove the fish from the marinade and pat dry.
- When the oil just starts to smoke, plop your fish down in it and cook for 3-5 minutes a side (turning once) until it reaches your favorite level of doneness. I like mine still flopping around, so I tend to find myself closer to the three-minute end of the spectrum.
Thursday, March 5, 2009
Dinner from the Pantry: Orzo with Garlicky White Beans and Chicken Sausage
 Hi readers, we've moved!
Read this post, and new ones, at the new Pithy and Cleaver! Thanks for updating your book marks. We hope you like the new design.
At Supper restaurant in the East Village, they treat every table to a bowl of white beans soaked in garlicky olive oil. Piled onto bread, these beans may very well be one of the best dishes the restaurant has to offer. (Though you shouldn't miss the Priest Stranglers or the perfect roast chicken.) I learned to reproduce those beans for a quick appetizer by trial and error when I first moved to the city, and "the bean thing" has since become a staple in our household. Having a can of white beans and a head of garlic around means I'll never be without a snack for surprise vistors, or short on food for a party.
But a girl cannot live on bread and beans alone, so I whipped up an extended remix, full-meal version here. Garlic, beans, and olive oil are still the stars of the show, but this hearty dish has a bit more to offer: salty sausage, fresh herbs, and sweet leeks flavor the pasta. A squeeze of lemon and a shaving of parmesan finish it off.

You may have everything in your pantry and freezer to make this right now. You may even be trying the eat-down-the-pantry challenge that everyone's writing about on Egullet and The Washington Post. Here is my offering to those watching their budgets and to those whose tiny apartment freezers and pantries are just too crowded. Just make sure anyone you might want to kiss has a bite of the garlicky stuff too.
Orzo with Garlicky White Beans and Chicken Sausage
serves 2
4 cloves garlic, smashed and chopped roughly
3 tablespoons olive oil
8 fresh sage leaves, washed and torn
1/2 tsp fresh oregano leaves
2 or 3 leeks, washed carefully and chopped
3 spicy italian chicken sausages, sliced in rounds (the ones I used were fully cooked)
1/2 cup wine or pasta water
1 can white beans, rinsed and drained
1/2 lb orzo
salt
parmesan and lemon wedges for serving
In a large saute pan or 3.5 qt dutch oven, saute garlic, sage, and oregano in olive oil until garlic begins to turn translucent. Add leeks and saute several minutes until softened. Meanwhile, boil water for the orzo. When leeks are softened, push them to the side of the pan. Add sliced sausages to open space and cook, turning occasionally, until brown (if you started with raw sausages, check to make sure sausage looks cooked through.) Salt pasta water generously and cook pasta according to package directions. Deglaze saute pan with wine or pasta water ladled from the cooking pasta. Add beans, cook 10 minutes. When pasta is cooked al dente, add to bean mixture and toss. Salt generously and serve with parmesan and a lemon wedge for squeezing.
Wednesday, March 4, 2009
Improvising Indian: Chickpeas and Greens Simmered in Yogurt
 Hi readers, we've moved!
Read this post, and new ones, at the new Pithy and Cleaver! Thanks for updating your book marks. We hope you like the new design.
I would love to invite a group of friends to my apartment for an Indian feast. I'd to try the tandoori chicken from a recent Cook's Illustrated (recipe here on The Bitten Word), charred under the broiler with a coating of garam masala, ginger, and chili powder. Perhaps I'd even make an attempt at naan with onion or garlic and a mango salsa. For dessert, an assortment of tropical sorbets, or maybe a coconut tapioca?
But when I saw a recipe for spinach simmered in yogurt with turmeric and coriander in last month's Food and Wine, I didn't want to wait for a big party. Perhaps it's end-of-winter braised-meat fatigue, or a vitamin deficiency as the cold weather drags on, but a bowl of greens is an appealing supper all on its own to me. Especially after trudging home through the slushy puddles overflowing every gutter in the city.
The very first mesclun leaves are appearing at the Union Square farmer's market, but I needed piles, since greens cook down to nothing. Don't underestimate—you probably need a bunch of greens per person if you're serving this as a main course. And if even if not, since it's delicious. I picked out spinach and nice-looking mustard greens at Whole Foods. To make it a bit more substantial, I added two cans of chickpeas for a tangy spin on chana saag. (I increased and varied the spices too after a taste—chickpeas take quite a bit of spice.)

I would not use frozen spinach for this, even if someone else gives you permission. Since the dish only simmers for a few minutes, fresh greens elevate it above takeout Indian. The mustard greens are pleasantly potent, and the spinach stays sweet and fresh. You could probably make this ahead, as well, cooking the spices and chickpeas and wilting the greens, then just combining it all with the yogurt to warm through when your guests arrive.
Chickpeas and Greens Simmered in Yogurt
Serves 2-3 as a main course
Inspired by Food and Wine, February 2009
2 bunches spinach, rinsed carefully
1 large bunch mustard greens
2 tablespoons vegetable oil
1 yellow onion, minced
5 garlic cloves, minced
1/2 teaspoon chile flakes
2 teaspoons ground coriander
2 teaspoons turmeric
1 teaspoon garam masala
1 teaspoon curry powder
1 teaspoon fresh ginger, chopped
2 cans chickpeas, rinsed and drained
1 tablespoon tomato paste
2 cups plain whole-milk yogurt
Salt
Carefully wash spinach and mustard greens and place in a large pot. The water clinging to the leaves will help steam the greens. Cook, covered, over moderate heat until barely wilted, stirring occasionally. Transfer to colander. Press excess water out of greens and set aside to cool. Coarsely chop.
Heat the oil over medium heat in a dutch oven, add the onion and saute until translucent. Add garlic and chile flakes and cook until fragrant. Add coriander, turmeric, garam masala, curry powder, and ginger, and toast one minute, stirring. Add the chickpeas and tomato paste, tossing to coat. Add 1/2 cup water to deglaze, and cook until evaporated. Add another 1/2 cup water, and cook 20 minutes, stirring frequently. When garbanzos are tender, lower the heat and add chopped greens and yogurt to the pot, stirring, five minutes, until the yogurt begins to separate. Season generously with salt and serve with rice.
Tuesday, March 3, 2009
You Salty Tart: Fresh Plum Tart with Goat Cheese and Walnut-Thyme Streusel
 Hi readers, we've moved!
Read this post, and new ones, at the newer, awesomer Pithy and Cleaver! Thanks for updating your book marks. We hope you like the new design.
Salty desserts are all the rage. It seems we're not satisfied anymore with simple sweets, we need them with smokey bacon! and Maldon salt! (And infused with the cereal-milk of our childhood dreams, but I haven't tried that yet.)
This tart isn't a brand-new invention, though—it's from a 2003 Bon Appetit recipe. Anticipating the trend, I guess.
 It's a fun, light-feeling dessert, with a nutty crust and fresh, uncooked goat cheese and ricotta filling. If you wait for plums to be in season, you'll get even tastier results. It's quite impressive-looking, and doesn't even require that you make pie crust!
The thing about salt in desserts, though, is that you have to be careful. One minute, you're fun and edgy, but a few pinches of Maldon later, you're serving pretzels with post-dinner coffee. So I've adjusted the salt a little in the recipe below. The sprinkle of Maldon or fleur de sel on top of the streusel is great, but the ricotta filling really didn't need it.
Plum Tart with Goat Cheese and Walnut-Thyme Streusel
Adapted from Bon Appetit
For the crust
1 cup all purpose flour
1/2 cup powdered sugar
1/2 cup walnuts (about 2 ounces)
1/4 teaspoon coarse kosher salt
7 tablespoons chilled unsalted butter, cut into 1/2-inch cubes
1 egg yolk
For the streusel
1 cup all purpose flour
2/3 cup walnuts (about 3 ounces)
1/3 cup (packed) golden brown sugar
1/3 cup sugar
1/4 teaspoon coarse kosher salt
1/4 teaspoon ground cinnamon
1/4 teaspoon ground nutmeg
1/4 teaspoon ground cardamom
1 teaspoon fresh thyme leaves
1/2 cup (1 stick) chilled unsalted butter, cut into 1/2-inch cubes
Filling and Topping
8 ounces soft fresh goat cheese
8 ounces (1 cup) whole-milk ricotta cheese
3 tablespoons honey
3 tablespoons extra-virgin olive oil
1 tablespoon sugar
1/4 teaspoon ground nutmeg
Pinch of freshly ground black pepper
4 large plums (about 1 pound), halved, pitted, cut into 1/4-inch-thick wedges
1/4 teaspoon fleur de sel (I used Maldon sea salt) for garnish
For crust:
Blend first 4 ingredients in processor until nuts are finely ground. If you don't have a food processor, chop nuts finely and add first 4 ingredients to a large bowl, blending with a pastry blender. Add butter; blend until coarse meal forms. Add egg yolk; blend until moist clumps form. Press dough onto bottom and up sides of 9-inch-diameter tart pan with removable bottom. Cover; chill 1 hour.
For streusel:
Preheat oven to 350°F. Blend flour, walnuts, both sugars, coarse salt, cinnamon, nutmeg, and cardamom in processor until nuts are finely ground. (or chop nuts and use pastry blender in a large bowl.) Add thyme and blend 5 seconds. Transfer mixture to medium bowl. Add butter. Using fingertips, rub in until small moist clumps form.
Spread streusel mixture on rimmed baking sheet. Bake 8 minutes. Stir, then continue baking until golden brown, about 7 minutes longer. Cool streusel completely (mixture will become crisp).
For filling and topping:
Combine both cheeses, 1 tablespoon honey, 1 tablespoon oil, sugar, nutmeg, and pepper in large bowl; stir to blend well. Refrigerate while baking crust.
Preheat oven to 350°F. Line crust with foil; fill with dried beans or pie weights. Bake crust until sides are set, about 15 minutes. Remove foil and beans. Continue to bake crust until golden brown, pressing with back of fork if crust bubbles, about 15 minutes longer. Cool crust completely.
Spread cheese filling in crust. Arrange plums in concentric circles atop filling, leaving 3/4-inch plain border. Sprinkle streusel lightly over tart. Refrigerate tart at least 1 hour and up to 4 hours.
Remove pan sides; place tart on platter. Drizzle with 2 tablespoons honey and 2 tablespoons oil; sprinkle with fleur de sel. Cut tart into wedges.
Sunday, March 1, 2009
Killer Porcini Mushroom Tomato Sauce: Satisfying Vegetarian for a Crowd

When you make dinner for nine people in a tiny apartment (or anywhere), it is not always perfect. The lasagna noodles may overcook and turn out a bit floppy, and you may run out of cheese for the topping. The pictures may be blurry and messy. But it's really just lucky you have enough chairs. And your guests are enjoying meeting each other, and there's plenty of wine.

While I'm not going to instruct you to recreate this exact lasagna, I wanted to share with you the recipe for the sauce I used. Because it's killer. It's earthy and deeply flavored, with the richness and strength of a heavy meat sauce, without any of the meat. Dried porcini mushrooms and their soaking liquid, along with an entire bottle of wine turn regular marinara into dinner-party material. It impressed vegetarians and carnivores alike. And this is not just a lasagna ingredient: this would be great on gnocchi or tagliatelle or piled onto shredded spaghetti squash and/or bitter greens.
Set aside a day to make this giant pot of sauce, and save it in portions in your freezer for a quick meal. It can simmer all day, and your patience will be rewarded.
A few notes on ingredients: I used an inexpensive ($5) Shiraz for this. Be sure to taste a sip to make sure the bottle is good before adding it to your sauce. Because wouldn't it be sad if the wine ruined it all! Also, I added one jar of pre-made Barilla marinara to the sauce base. I realize this is cheating, but I find it evens out the edges a little, and provides a neutral base for your fresh flavorings.
Killer Porcini Mushroom Tomato Sauce
1 oz porcini mushrooms
2 cups water
2 yellow onions, chopped
1/2 T fennel seeds
2 T tomato paste
6 cloves garlic, smashed and chopped
1/2 tsp fresh rosemary, chopped
1/2 tsp dried basil
1 large portobello mushroom, chopped
salt and pepper
1/2 teaspoon red pepper flakes
1 bottle dry red wine (I used Shiraz)
1 28-oz can crushed tomatoes
1 28-oz can diced tomatoes
1 jar (24 oz) prepared marinara sauce (I used Barilla)
1/4 cup fresh oregano leaves
Soak porcini mushrooms in 2 cups boiling water for 30 minutes. Rinse porcini and chop, saving liquid. Pour liquid through a strainer lined with a paper towel to remove dirt and save. Meanwhile, saute onions in a large (at least 6 quart) heavy dutch oven over medium low, stirring often, about 20 minutes until translucent and beginning to color. Add fennel seeds and tomato paste, stir and let caramelize for a minute. Add garlic, rosemary, basil, and portobello mushroom, saute 1 minute more. Add a pinch of salt and several grinds of fresh pepper along with red pepper flakes.
Pour 2 cups of wine into the pan to deglaze, stir and scrape browned bits from the bottom of the pan. Cook until wine evaporates. Add both cans of tomatoes and their liquid along with prepared marinara. Add chopped porcini along with half their liquid. Let simmer (it should be just lightly bubbling) until reduced slightly, about 20 minutes, then add another cup of wine and the remaining porcini liquid. Continue cooking and adding wine a cup at a time until entire bottle has been added. This could take an hour.
Let simmer on very low heat at least 2 more hours and up to six, stirring occasionally. When ready to serve, stir in fresh oregano leaves. Taste for seasoning.
Subscribe to:
Posts (Atom)

